Blueprint's Bowler Delivery Parameters: An Introduction
Date Posted:
November 20, 2011
Category:
Blueprint Tutorials
One of the features of Powerhouse Blueprint is its ability to simulate a bowling
ball's on-lane performance using a bowler's actual delivery parameters.
Delivery parameters include everything necessary to describe how the ball is
rolled. This post will provide some definition for these parameters so you
can be sure you are correctly interpreting the values you use in Blueprint.
Target Line Parameters
 Since the target line inputs are pretty
self-explanatory, we'll lump them together and describe them all at once, rather
than separately. In short, the three target line inputs tell Blueprint
where the ball is at the foul line and what its "launch angle" is, based on
target ball position and target distance from the foul line. In the
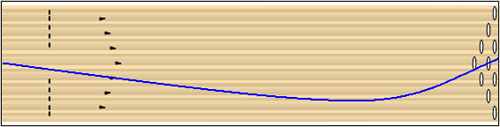
example shown, this ball is placed on the 20th board at the foul line and it is
"aimed" at the 15th board at a distance from the foul like of 14 feet (which is
approximately how far the third arrow is from the foul line). On-lane,
this looks like the following:
Since the target line inputs are pretty
self-explanatory, we'll lump them together and describe them all at once, rather
than separately. In short, the three target line inputs tell Blueprint
where the ball is at the foul line and what its "launch angle" is, based on
target ball position and target distance from the foul line. In the
example shown, this ball is placed on the 20th board at the foul line and it is
"aimed" at the 15th board at a distance from the foul like of 14 feet (which is
approximately how far the third arrow is from the foul line). On-lane,
this looks like the following:
Pretty self-explanatory? We hope so. If not, then just experiment
with this in Blueprint for a few minutes and you should pretty much get the hang
of it.
Ball Speed
Blueprint requires that you input a bowler's ball speed (in miles per hour,
or mph) at the release.
This is the speed of the ball as it leaves the bowler's hand. This is
quite different than average ball speed (as the ball travels the entire length
of the lane) and extremely different than the ball speed reported by down-lane
automatic score keeping systems. Why? Because, in general, the ball
loses a fairly significant amount of its launch speed as it encounters friction
during its trip down the lane. For example, consider the speed of the ball
in the above target line example:
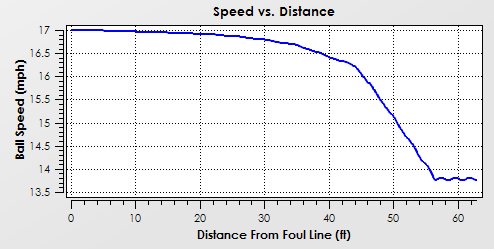
The launch ball speed in this example is 17 mph. By the end of the lane,
this ball is traveling less than 14 mph. At 50 feet from the foul line
(which is in the vicinity of many automatic score keeping system's ball speed
sensors), the ball is traveling about 15 mph. The reason this distinction
is important is because using incorrect (non-launch) ball speeds in Blueprint
will result in a lot of error in predicted ball paths. Continuing this
example, if you were to input 15 mph as the ball speed instead of the correct
value of 17 mph, Blueprint would predict the ball path shown below in red:

What does this show? It shows that if you were to make this input error,
Blueprint would predict that the ball would hook DRASTICALLY more (about six
boards, in this case) than it would in reality. So, to summarize, make sure you
are using launch ball speeds in Blueprint to ensure that your ball path
predictions are as accurate as possible.
Rev Rate
Similarly, Blueprint utilizes a bowler's rev rate (in revolutions per minute, or
RPM) at the release. Just as was the case with ball
speed, the release rev rate is significantly different than the average rev rate
(as the ball travels the entire length of the lane). This is because, in
general, the rev rate significantly increases as the ball encounters friction
down-lane. Again continuing the above example, take a look at this
ball's rev rate as it travels down the lane:
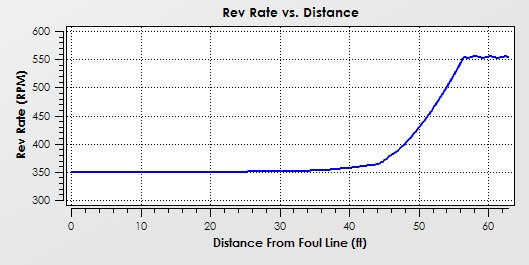
By the time this ball gets to the end of the lane, its rev rate has increased
from 350 RPM to over 550 RPM. If you were to attempt to utilize an average
rev rate (say, 425 RPM in this example) in Blueprint, combined with an automatic
score keeper ball speed of 15 mph, you would end up with a predicted ball path
as shown below by the green line:
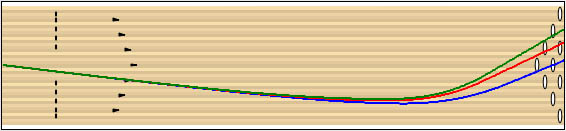
As shown, the combined error of using a down-lane ball speed and an average rev
rate as inputs results in a very large over-hook prediction by Blueprint (10
boards in this example). So, again, as was the case above with ball speed,
make sure that you utilize launch rev rates in Blueprint to ensure that the ball
path simulation is as accurate as possible.
Axis Rotation Angle
Axis rotation angle is a measure of the amount of side roll the ball has
relative to its direction of travel. Again, Blueprint expects that you
will input the axis rotation angle at the ball's release point. A ball
with very little side roll has a low axis rotation angle (for example, 0 to 20
degrees) and a ball with a lot of side roll has a high axis rotation angle
(60-90 degrees).
The best way of determining a bowler's launch axis rotation angle is by
observing the location of the ball's rotation axis at the release (commonly
called the "positive axis point," or PAP).
If, when viewed straight from behind, the rotation axis is in the center of the
ball, this would correspond to an axis rotation angle of 90 degrees. If,
however, the rotation axis is all the way on the left edge of the ball (when
viewed from behind, for a right-handed bowler), this would correspond to an axis
rotation angle of 0 degrees.
While the above is certainly a vague description, it hopefully at least provides
a starting point for those readers unfamiliar with axis rotation angle. We
will try to expand upon this topic in a future article and provide more details
on exactly how the axis rotation angle can be calculated using video analysis.
Axis Tilt Angle
Axis tilt angle is a measure of the amount that the ball's axis of rotation is
tilted from the horizontal direction. 0 degrees of axis tilt means that
the ball's axis of rotation is purely horizontal (parallel to the surface of the
lane). 90 degrees of axis tilt means that the ball is spinning like a top
(and hence, rotating about a purely vertical axis). Axis tilt can be
measured using video analysis (by looking at the inclination of the axis of
rotation relative to the horizontal direction), but a better method is to measure the
diameter of the ball track, which is directly correlated to axis tilt angle.
Again, we hope to provide a more detailed description of axis tilt angle in a
future article, along with the procedure for calculating tilt from ball track
diameter.
Loft Distance
Finally, we arrive at loft distance, which is perhaps the simplest input
parameter in Blueprint. Loft distance, quite simply, is the distance
(measured in feet) from the foul line that the ball lands on the lane.
There's really nothing more to say about this, so we'll just leave it at that!
But How Do I Measure All Of These Things?
Obviously, the big weakness of this article is that it doesn't provide much, if
any, guidance on how to best measure these bowler input parameters. While
we plan to tackle this topic in a future article, we would for now like to
recommend that you visit the BowlingChat.net "Bowler Measurements" Wiki, which provides some great
information on obtaining accurate bowler delivery parameters.